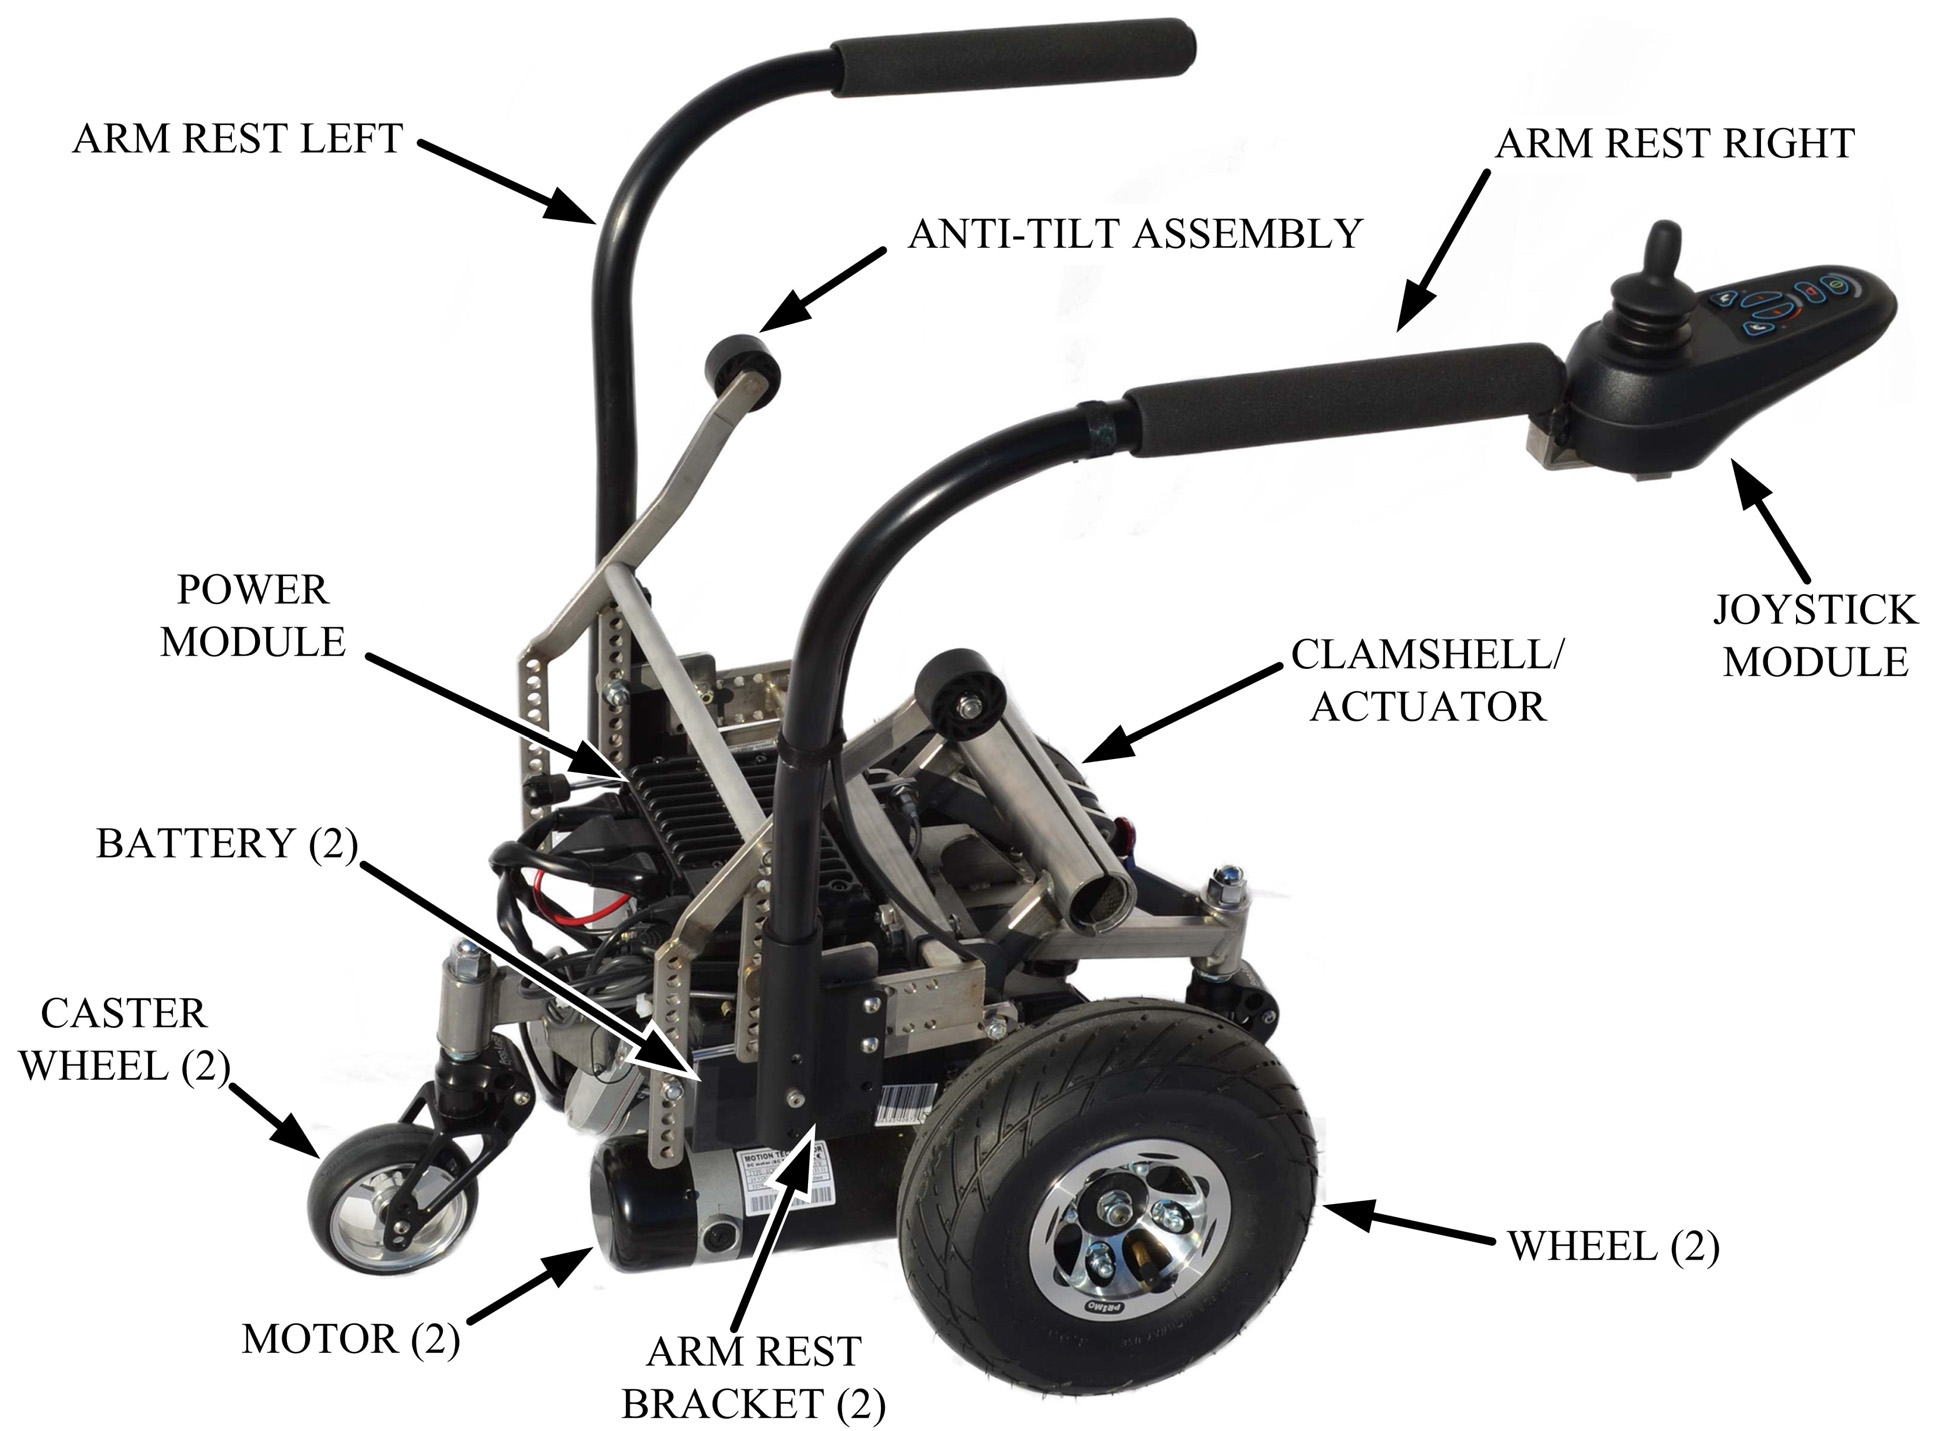
Operating the ZX-1 Power Add-on
|
|
|
Connect the ZX-1 to the wheelchair
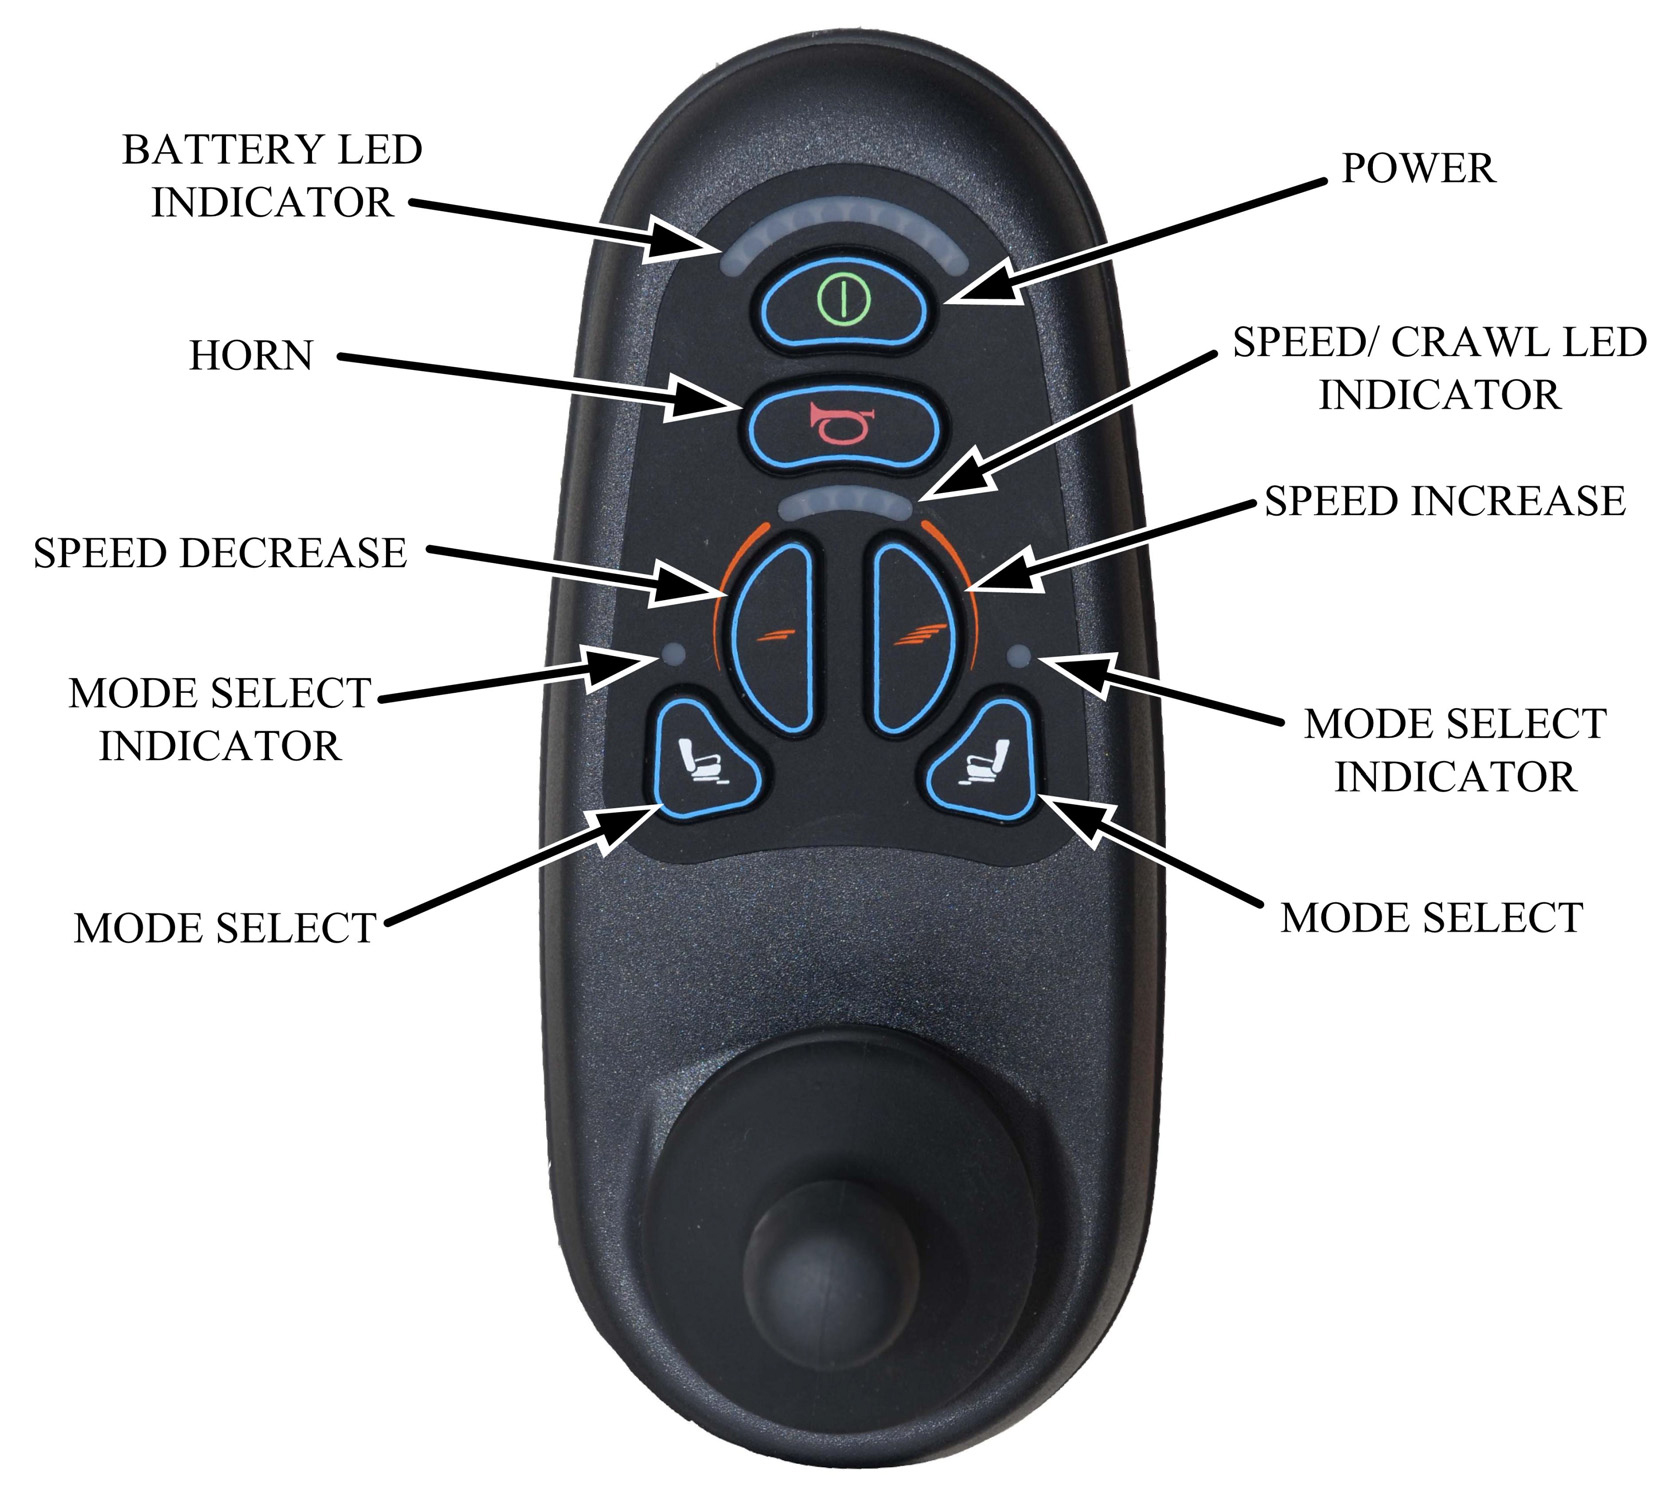
- Disconnect the battery charger from the charger port below the joystick module.
- Press the Power button to power on the ZX-1.
- Verify the battery level displays green on the Battery LED indicator.
- Press the Mode Select button to place the ZX-1 in driving mode.
- Move the ZX-1 so there is room to engage the wheelchair.
- Press the Power button to power off the ZX-1.
- Remove the armrests and place them in the backpack.
- Disengage the Anti-Tips by pressing on the release levers and raising them.
- Press the Power button to power on the ZX-1.
- Open the ZX-1 Clamshell by selecting the Mode Select button and push the joystick forward until Clamshell completely lowers.
- Move the wheelchair back and lightly lift it until the camber tube is flush against the ZX-1 Clamshell and verify the Clamshell is centered with the wheelchair camber tube.
- Ask Rob to put the wheelchair brakes on.
- Ask Rob to pull the joystick aft until the Clamshell closes completely, and rear wheels of the wheelchair stand slightly off the ground. Verify the Clamshell is secured to wheelchair camber tube.
- Ask Rob to press the Mode Select button to place the ZX-1 into drive mode and use the ZX-1.
Disconnect the ZX-1 from the wheelchair
- Open the ZX-1 Clamshell by selecting the Mode Select button and push the joystick forward until Clamshell completely lowers.
- Press the Power button to power off the ZX-1.
- Move the wheelchair forward by lightly lift it away from the ZX-1.
- Replace the armrests and engage the Anti-Tips by pressing on the release levers and lowering them.
- Press the Power button to power on the ZX-1.
- Press the Mode Select button to place the ZX-1 in driving mode.
- Move the ZX-1 to the side of the room.
- Press the Power button to power off the ZX-1.
- Connect the battery charger to the charger port below the joystick module.
Notes: If you need to ride over curbs greater than 5 cm / 2 inches disconnect the ZX-1. If you need to manually operate the ZX-1 in Freewheel-Mode, with the wheelchair disconnected and the power off, turn the freewheel levers outward.
Het Gebruik van de ZX-1 Power Add-on (Nederlands)
Aankoppel de ZX-1 met de rolstoel
- Ontkoppel de acculader van de lader poort onder de joystick module.
- Druk op de Power knop om de ZX-1 te aanzetten.
- Controleer het batterijniveau wordt groen weergegeven op de Batterij LED indicator.
- Druk op de mode select knop om de ZX-1 in rijmodus te plaatsen.
- Verplaats de ZX-1 zodat er ruimte is om de rolstoel te koppel.
- Druk op de Power knop om de ZX-1 te uitzetten.
- Verwijder de armleuningen en plaats ze in de rugzak.
- Uitschakelen de Anti-Tips door te drukken op de release hendels en het verhogen van hen.
- Druk op de Power knop om de ZX-1 te aanzetten.
- Open de ZX-1 Clamshell door het selecteren van de Mode Select knop en duw de joystick naar voren totdat de Clamshell volledig verlaagt.
- Zet de rolstoel heen en lichtjes op te tillen tot het camberbuis vlak tegen de ZX-1 Clamshell en controleer de Clamshell is gecentreerd met de rolstoel camberbuis.
- Vraag Rob om de rolstoel op de rem te zetten.
- Vraag Rob de joystick naar achteren te trekken totdat de Clamshell helemaal dicht is en achterwielen van de rolstoel staan een beetje boven de grond. Controleer de Clamshell aan de rolstoel camberbuis is bevestigd.
- Vraag Rob om te druk op de mode select knop om de ZX-1 in rijmodus te plaatsen en gebruik maken van de ZX-1.
Ontkoppel de ZX-1 van de rolstoel
- Open de ZX-1 Clamshell door het selecteren van de Mode Select knop en duw de joystick naar voren totdat de Clamshell volledig verlaagt.
- Druk op de Power knop om de ZX-1 te uitzetten.
- Zet de rolstoel naar voren door licht optillen uit de buurt van de ZX-1.
- Vervang de armleuningen en schakel de Anti-tips door te drukken op de release hendels en ze te verlagen.
- Druk op de Power knop om de ZX-1 te aanzetten.
- Druk op de Mode Select knop om de ZX-1 in rijmodus te plaatsen.
- Verplaats de ZX-1 aan de kant van de kamer.
- Druk op de Power knop om de ZX-1 te uitzetten.
- Aankoppel de acculader van de lader poort onder de joystick module.
Opmerkingen: Als u nodig hebt om te rijden over stoepranden groter dan 5 cm / 2 inch koppel de ZX-1. Als u nodig hebt om de ZX-1 hand te bedienen in de vrijloop-modus, met de rolstoel afgekoppeld en de stroom uit, schakel de vrijloop hendels naar buiten.
Online Diagnostics
The Diagnostic Process
Flash Code List
If the vehicle you are working with contains a PG Drives Technology TruCharge battery gauge, these pages will be a valuable working tool. They will enable OEMs, Dealers and Users to identify the area in which their control system has detected a trip, and in some cases even make repairs.
Trip Codes
Trip Codes can be read from Handheld Programmer or an vehicle’s on-board LCD Screen. http://support.pgdt.com/getattachment/Online-Diagnostics/Diagnostic-Guides-Document-Listings/pgdt_mobility_diagnostics.pdf.